Extend Better Contact (sp_bettercontact) with custom fields

Extending Better Contact (sp_bettercontact) to include custom fields is quite easy. Lets assume that we want to add first_name and last_name as input fields in our contact form.

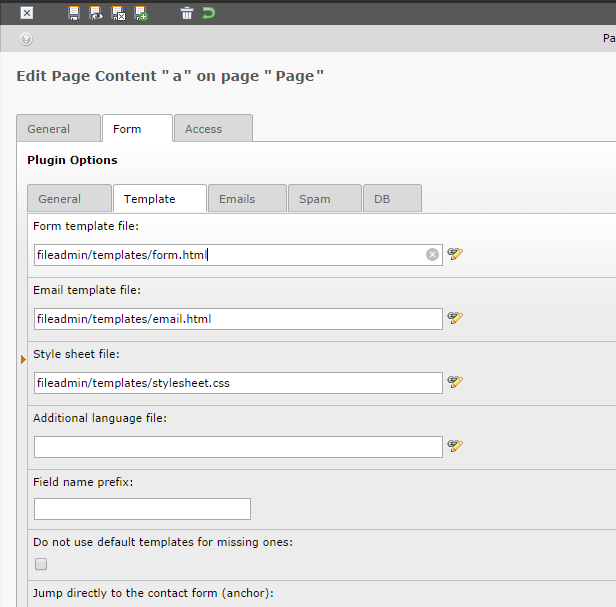
First of all you need to find and adjust your HTML template. You can find default version in sp_bettercontact plugin directory, e.g. EXT:sp_bettercontact\res\templates\frontend\form.html. Preferably make a copy somewhere in your fileadmin folder and instruct sp_bettercontact plugin to use copy of template.

sp_bettercontact_template

Insert fields into HTML template:


<!--
Field for first name
-->
<p class="tx_spbettercontact_message">###MSG_FIRST_NAME###</p>
<label for="###FIRST_NAME###" class="tx_spbettercontact_label firstname_label">###LABEL_FIRST_NAME### ###REQUIRED_FIRST_NAME###</label>
<input type="text" name="###FIRST_NAME###" value="###VALUE_FIRST_NAME###" class="###ERR_FIRST_NAME###" />
<br />
<!--
Field for last name
-->
<p class="tx_spbettercontact_message">###MSG_LAST_NAME###</p>
<label for="###LAST_NAME###" class="tx_spbettercontact_label lastname_label">###LABEL_LAST_NAME### ###REQUIRED_LAST_NAME###</label>
<input type="text" name="###LAST_NAME###" value="###VALUE_LAST_NAME###" class="###ERR_LAST_NAME###" />
<br />

Please note syntax of HTML markers (MSG_, VALUE_, ERR_, REQUIRED_, LABEL_).

Afterwards we need to make sp_bettercontact plugin aware of new fields via TypoScript setup, e.g.:


plugin.tx_spbettercontact_pi1 {
 fields {
  first_name {
   required = 1
   minLength = 3
   maxLength = 70
   regex =
   disallowed = 0123456789<>(){}!?%&§$
   allowed =
   default =
  }
  last_name {
   required = 1
   minLength = 3
   maxLength = 70
   regex =
   disallowed = 0123456789<>(){}!?%&§$
   allowed =
   default =
  }
 }
 _LOCAL_LANG.default {
  msg_first_name_empty = First name missing!
  msg_last_name_empty = Last name missing!
 }
}

As for labels and translations, you could inline them like in above example or you could use locallang.xml file to insert you own localisations. Take a look at EXT:sp_bettercontact\res\templates\examples\additional_locallang.xml file.

Automatically fill user data in Better Contact (sp_bettercontact)

Sometimes we want our contact forms to come pre-populated with data that we already know in order to make things easier for end user. Here is a snippet of TypoScript code that will populate our new variables with first name and last name of registered user (provided he’s logged in):


[loginUser = *]
lib.val_first_name = TEXT
lib.val_first_name.data = TSFE:fe_user|user|first_name
 
lib.val_last_name = TEXT
lib.val_last_name.data = TSFE:fe_user|user|last_name
 
plugin.tx_spbettercontact_pi1.fields.first_name.default < lib.val_first_name
plugin.tx_spbettercontact_pi1.fields.last_name.default < lib.val_last_name
[global]

If you with to prevent users from editing pre-populated fields consider using readonly HTML tag instead of disabled for input elements because contact form might have a trouble reading data from disabled elements.
Integrate Piwik in Typo3

“Piwik is the leading open source web analytics platform that gives you valuable insights into your website’s visitors, your marketing campaigns and much more, so you can optimize your strategy and online experience of your visitors.”

Source: http://piwik.org/

Piwik works more or less the same way Google Analytics or any similar analytics platform does. One major difference is that you can host Piwik instance on your own servers without the need to share data with 3rd party vendors. So step #1 is obviously to install Piwik on your own server. Installation is dead simple and FTP access (along with prepared database for data storage, e.g. MySql) will suffice. Copy files, setup database connection string and you’re good to go.
Once installed you should insert generated javascript code (adding new web site to track will provide you with javascript code) into your HTML code. You can insert it either in HTML template file, via TypoScript e.g. page.jsFooterInline or directly in page’s HTML e.g. page.99.value = ….

jsFooterInline will wrap javascript code in <script> tag for you and place it right before body closing tag.


page.jsFooterInline {
  10 = TEXT
  10.value (
  var _paq = _paq || [];
  _paq.push(['trackPageView']);
  _paq.push(['enableLinkTracking']);
  (function() {
    var u = (("https:" == document.location.protocol) ? "https" : "http") + "://domain/piwik_instance/";
    _paq.push(['setTrackerUrl', u+'piwik.php']);
    _paq.push(['setSiteId', 1]);
    var d=document, g=d.createElement('script'), s=d.getElementsByTagName('script')[0]; g.type='text/javascript';
    g.defer=true; g.async=true; g.src=u+'piwik.js'; s.parentNode.insertBefore(g,s);
  })();
  )
}

Also note that with config.removeDefaultJS = external, the inlineJS is moved to an external file.

Inserting javascript directly into page’s HTML might look like this:


page.99 = TEXT
page.99.value (
  var _paq = _paq || [];
  _paq.push(['trackPageView']);
  _paq.push(['enableLinkTracking']);
  (function() {
    var u=(("https:" == document.location.protocol) ? "https" : "http") + "://domain/piwik_instance/";
    _paq.push(['setTrackerUrl', u+'piwik.php']);
    _paq.push(['setSiteId', 1]);
    var d=document, g=d.createElement('script'), s=d.getElementsByTagName('script')[0]; g.type='text/javascript';
    g.defer=true; g.async=true; g.src=u+'piwik.js'; s.parentNode.insertBefore(g,s);
  })();
  )
page.99.wrap = <script type="text/javascript">|</script>
page.100 = TEXT
page.100.value (
<noscript><p><img src="http://domain/piwik_instance/piwik.php?idsite=1&rec=1" style="border:0;" alt="" /></p></noscript>
)

In case javascript is disabled <noscript> (page.100) tag will be executed and Piwik will gather data using image tracking tag. We should append this bit at the end either way (also when using jsFooterInline).

Piwik also supports custom variables, i.e. it gives you ability to collect some custom data about your users and pages they’re visiting. By default is supports up to 5 different custom variables with two different scopes for each of them: “visit” and “page”.

Syntax is rather simple:

_paq.push(['setCustomVariable', variable_id, variable_name, variable_value, scope]);

variable_id = id of variable we want to track, range from 1-5
variable_name = name of variable
variable_value = value to be inserted
scope = scope we want to track, either “visit” or “page”

So you might jam something like this in the middle of your javascript tracking code:

...
_paq.push(['setSiteId', 1]);
_paq.push(['setCustomVariable', 1, "Usergroup", _usergroup, "visit"]);
_paq.push(['setCustomVariable', 1, "Usergroup", _usergroup, "page"]);
_paq.push(['setCustomVariable', 2, "Country", _country, "visit"]);
_paq.push(['setCustomVariable', 2, "Country", _country, "page"]);
_paq.push(['trackPageView']);
...

just make sure to fill _usergroup and _country javascript variables with correct data.

Display myquizpoll results in html table with TypoScript

Myquizpoll is a nice plugin that does exactly what the name suggests, it’s a plugin that allows you to create various quizes, tests etc.
Here is a simple TypoScript code that will display table with quiz results (from myquizpoll plugin) for currently logged in user.


plugin.myquizpoll_results > 
plugin.myquizpoll_results = COA_INT
plugin.myquizpoll_results {
 # get current user
 15 >
 15 = LOAD_REGISTER
 15 {
  current_uidvaluex >
  current_uidvaluex.cObject = CONTENT
  current_uidvaluex.cObject {
   table = fe_users
   select {
   pidInList = 5 # page ID of storage folder
   recursive = 1 # search in sub folders
   where.wrap = username = '|'
   where.data = TSFE:fe_user|user|username
   orderBy = name ASC
   }
   renderObj = TEXT
   renderObj.field = uid
  }
  tablebody >
  tablebody.cObject = CONTENT
  tablebody.cObject {
   wrap = <table style="width: 100%;"><tr><td><h2>Test name</h2></td><td><h2>Number of questions</h2></td><td><h2>Correct</h2></td><td><h2>% correct</h2></td></tr>|</table>
   table = tx_myquizpoll_result
   select {
     selectFields = tx_myquizpoll_result.fe_uid, tx_myquizpoll_result.o_percent, tx_myquizpoll_category.name, tx_myquizpoll_result.p_or_a, tx_myquizpoll_result.o_max
     leftjoin = tx_myquizpoll_category ON(tx_myquizpoll_category.uid=tx_myquizpoll_result.lastcat)
     where = tx_myquizpoll_result.fe_uid = ###current_uidvaluex###
     pidInList = 16 # page ID with myquizpoll records
     recursive = 1 # search in sub folders
     markers { # replace markers with current user ID
      current_uidvaluex = TEXT
      current_uidvaluex.data = register:current_uidvaluex
     }
   }
   renderObj.wrap = <tr>|</tr>
   renderObj = COA
   renderObj {
    ## The header
    10 = HTML
    10 {
     value.field = name
     value.wrap = <td>|</td>
    } 
    20 = HTML
    20 {
     value.field = o_max
     value.wrap = <td>|</td>
    }
    
    30 = HTML
    30 {
     value.field = p_or_a
     value.wrap = <td>|</td>
    } 
  
    40 = HTML
    40 {
     value.field = o_percent
     value.wrap = <td>|</td>
    } 
   }
  }
 }
 20 = TEXT
 20.data = register:tablebody
 20.wrap = <div class="results" title="Results">|</div>
}


One thing that should be modified is pidInList that should point to your pages with data. If you keep getting old or weird results try to disable cache on that page…

A word or two about multiple select list in user registration form

When extending user registration form (sr_feuser_register) you might need list of check-boxes or multiple select list. So after extending database and adding fields to fe_users table you’ll need to edit ext_tables.php in typo3conf/ext/sr_feuser_register folder and create new entries for this list:


$tempColumns = array(
"checkboxlist" => Array (
"exclude" => 1,
"label" => "LLL:EXT:sl_timetracking/locallang_db.xml:fe_users.checkboxlist",
"config" => Array (
"type" => "check",
'items' => Array (
Array('value1', 1), // these are actual text values that will be displayed alongside
Array('value2', 2),
Array('value3', 3),
Array('value4', 4),
Array('value5', 5),
Array('value6', 6),
Array('value7', 7),
// ...
),
)
),
);
t3lib_div::loadTCA("fe_users");
t3lib_extMgm::addTCAcolumns("fe_users",$tempColumns,6);

to display this list edit template used by sr_feuser_register e.g. typo3conf/ext/sr_feuser_register/pi1/tx_srfeuserregister_pi1_css_tmpl.html.


<div class="checkboxlist">
###TCA_INPUT_checkboxlist###
</div>

These values once checked will be stored in database table fe_users, in our case column checkboxlist. Type of database field should be integer e.g.:


CREATE TABLE fe_users (
checkboxlist int(11) DEFAULT '0' NOT NULL
);

values are stored as bitmap masks so it won’t make much sense looking at raw data. Nifty trick to decode them is to cross join a simple table of numbers, in this case named ‘tNum‘ with one column named ‘nr‘. Cross join will cause each row (number in our case) from one table to be joined to each row of another and then we just pick rows that have bitwise mask on, e.g. where (listofbits & 2 << tNum.nr) > 0.

Sample code:


SELECT
uid,
pid,
FROM_UNIXTIME(tstamp) as tstamp, -- convert timestamp to humanly readable format
username,
usergroup,
CONVERT(GROUP_CONCAT(tNum.nr + 1), CHAR(256)) as checkboxlist, -- this will concatenate list of ID's in format '1, 2, 3, 4 ...'
disable,
name,
first_name,
middle_name,
last_name,
email
-- etc
FROM
fe_users
CROSS JOIN tNum
WHERE
tNum.nr < 64
AND (checkboxlist & 2 << tNum.nr) > 0
GROUP BY
uid

a step further would be to create new lookup table with actual id-value pairs that could be joined against query above and concatenate actual string values instead of id values.
This can be queried directly in mysql console or you can use some plugin to export data in csv format, e.g. Alat Systems sql to csv exporter (assql2csv).
Worth mentioning, if you plan to have more than 32 values you’ll need to change field type from int to bigint or something otherwise you’ll experience weird behaviour selecting high [checkbox] values.

Debugging

Simply add this to your localconf.php file (<root>/typo3conf/localconf.php):


$TYPO3_CONF_VARS['SYS']['devIPmask'] = 'your_ip_address,::1';
$TYPO3_CONF_VARS['SYS']['displayErrors'] = '2';

This should provide you with some meaningful error messages instead of blank pages.

$TYPO3_CONF_VARS[‘SYS’][‘displayErrors’] can have these values: -1, 0, 1, 2 which translates to:

-1 Default setting. With this option, you can override the PHP setting “display_errors”. If devIPmask matches the users IP address the configured “debugExceptionHandler” is used for exceptions, if not “productionExceptionHandler” will be used.
0 Do not display any PHP error messages. Overrides the value of “exceptionalErrors” and sets it to 0 (= no errors are turned into exceptions),the configured “productionExceptionHandler” is used as exception handler
1 Display error messages with the registered error handler, the configured “debugExceptionHandler” is used as exception handler
2 Display errors only if client matches TYPO3_CONF_VARS[SYS][devIPmask]. If devIPmask matches the users IP address the configured “debugExceptionHandler” is used for exceptions, if not “productionExceptionHandler” will be used.

So we chose to display error messages only to certain IP adresses specified in $TYPO3_CONF_VARS[‘SYS’][‘devIPmask’].

Additionally we might want to add these flags to localconf.php file:


$TYPO3_CONF_VARS['SYS']['sqlDebug'] = '1';
$TYPO3_CONF_VARS['BE']['debug'] = '1';
$TYPO3_CONF_VARS['FE']['debug'] = '1';

$TYPO3_CONF_VARS[‘SYS’][‘sqlDebug’] sets sql debugging level. Possible values are:

0 no SQL shown (default)
1 show only failed queries
2 show all queries

$TYPO3_CONF_VARS[‘BE’][‘debug’] is new mode for debugging added with Typo3 4.5:

“A new mode was added to debug the backend with $TYPO3_CONF_VARS[‘BE’][‘debug’] = ‘1’; it disables the login refresh ajax call and instructs the page renderer not to merge the loaded javascript and CSS files, easing debugging with tools like Firebug.”

Source Typo3 Wiki.

$TYPO3_CONF_VARS[‘FE’][‘debug’] should enable frontend debugging.

Additionaly, Typo3 stores frontend and backend errors in sys_log database table. You might want to store these in some separate log file:

$TYPO3_CONF_VARS['SYS']['systemLogLevel'] = '0';
$TYPO3_CONF_VARS['SYS']['systemLog'] = 'error_log';

$TYPO3_CONF_VARS[‘SYS’][‘systemLogLevel’] defines verbosity levels:

0 info
1 notice
2 warning
3 error
4 fatal error

And $TYPO3_CONF_VARS[‘SYS’][‘systemLog’] defines logging method:

file file,<abs-path-to-file>[,<severity>] log to a file
mail mail,<to>[/<from>][,<severity>] send log entries via mail
syslog syslog,<facility>,[,<severity>] use the operating system’s log. Facility may be one of LOCAL0 .. LOCAL7, USER (on Windows USER is the only valid type).
error_log error_log[,,<severity>] use PHP error log

Remember to turn these off in production environment.

Displaying Log off link

To display Log off link, e.g. “Welcome username Log off“:

Setup.TS


lib.welcomeLogOff = COA_INT
lib.welcomeLogOff {
 10 = COA
 10 {
  20 = TEXT
  20.typolink.parameter = 1
  20.typolink.returnLast = url
  20.wrap = <form id="logoutform" action="|" method="post">
  25 = TEXT
  25.wrap = Welcome 
  30 = COA
  30 {
   3 = TEXT
   3.data = TSFE:fe_user|user|username
   4 = TEXT
   4.value =  
   5 = TEXT
   5.value = Log off
   5.wrap = <a href="javascript:{}" onclick="document.getElementById('logoutform').submit(); return false;">|
   10 = TEXT
   10.value = <input type="hidden" name="logintype" value="logout" />
   20 = TEXT
   20.value = <input type="hidden" name="redirect_url" value="" />
   30 = TEXT
   30.value = </form>
  }
 }  
}

or simply:

Setup.TS


lib.logout {
 10 = TEXT
 10 {
  value = Logout
  typolink.parameter.data = TSFE:id
  typolink.additionalParams = &logintype=logout
 }
}

this snippet will create link to current page and add “logintype” variable (&logintype=logout) at the end. If you click on this link Typo3 will sign you out.

Extend felogin with custom markers

Setup:

Typo3 4.7.7
plugins:
– felogin
– myquizpoll

Setup.TS


plugin.tx_felogin_pi1.customMarkers {
 FEUSER_NUM_OF_POINTS {
  5 >
  5 = LOAD_REGISTER
  5 {
   current_uidvalue >
   current_uidvalue.cObject = CONTENT
   current_uidvalue.cObject {
    table = fe_users
    select {
     pidInList = 5
     recursive = 1
     where.wrap = username = '|'
     where.data = TSFE:fe_user|user|username
     orderBy = name ASC
    }
    renderObj = TEXT
    renderObj.field = uid
   }
   current_totalpoints >
   current_totalpoints.cObject = CONTENT
   current_totalpoints.cObject {
    table = tx_myquizpoll_result
    select {
     selectFields = COALESCE(SUM(tx_myquizpoll_category.tx_myquizbodovi_brbodova),0) AS suma
     leftjoin = tx_myquizpoll_category ON(tx_myquizpoll_category.uid=tx_myquizpoll_result.lastcat)
     where = tx_myquizpoll_result.fe_uid = ###current_uidvalue###
     pidInList = 5
     recursive = 1
     markers {
      current_uidvalue = TEXT
      current_uidvalue.data = register:current_uidvalue
     }
    }
    renderObj = TEXT
    renderObj.field = suma
   }
   current_dbg.cObject = CONTENT
   current_dbg.cObject {
    renderObj = TEXT
    renderObj.data = TSFE:fe_user|user|username
   }
  }
  10 = TEXT
  10.data = register:current_totalpoints
  10.wrap = |
  10.typolink.parameter = 50
 [usergroup=4]
  10.typolink.parameter = 203
 [global]
  10.if.value.data = register:current_totalpoints
  10.if.equals = 0
  15 = TEXT
  15.data = register:current_totalpoints
  15.wrap = |
  15.typolink.parameter = 50
 [usergroup=4]
  15.typolink.parameter = 203
 [global]
  15.if.value.data = register:current_totalpoints
  15.if.equals = 0
  15.if.negate = 1
 }
}

Redirect / restrict access

Setup:

Typo3 4.7.7
usergroup that we want to redirect to another page: 6.
pageID for target: 100.

Setup.TS


[usergroup=6]
 config >
 config.additionalHeaders = Location: /index.php?id=100
 page >
 page = PAGE
 page.10 = TEXT
 page.10.value=No Access!
[global]

Create menu from folder

Sometimes we need to create menus or list of items that are not strictly reflecting the current page-structure.
Using “special” property of hierarchical menus (HMENU) we can change the way menu is generated.


special = directory
special.value = 1

Setting HMENUs “special” property to “directory” enables us to create new menu from pages (and their child pages) selected in special.value property (e.g. special.value = 100, 101, 102). If no value is specified, default pid is the current page.


lib.folder_links = HMENU
lib.folder_links{
 special = directory
 special.value = 1 # id of parent item
 1 = TMENU
 1 {
  wrap = <ul class="link">|</ul>
  expAll = 1
  NO.wrapItemAndSub = <li>|</li>
  ACT < .NO
  ACT = 1
  ACT.ATagParams = class="active"
 }
}

special property of hierarchical menus can have these values: “directory” / “list” / “updated” / “browse” / “rootline” / “keywords” / “language” and they are explained in detail on http://wiki.typo3.org/TSref/HMENU.